Tuesday, January 31, 2012

A Pretty Princess Birthday Party (On a Budget)

So my daughter's second birthday is coming up, I got together with Colleen to come up with ideas for a theme and she suggested a princess party. I thought this was perfect so we started cruising the web to come up with ideas for the party and got together the next day to plan it.

Let me tell you, if you are on a budget, the dollar store is your friend.  And even if you aren't, we found the coolest stuff there. Thank goodness it is about Valentine's Day time, so there was a lot of pink stuff at the store.

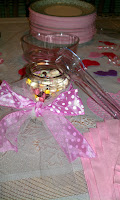
We came up with the idea of doing a candy bar for the guests to fill up on before going home. We got some glass jars and candy dishes, some great pink candies, some little clear plastic tongs, and some favor boxes to put it all in.

For the favor boxes, we got some little foam hearts to glue on, some heart stickers and some curling ribbon.

For the candy jars, we got some tulle and some ribbon and tied them around the jars into bows.

We got pink and white napkins and pink and silver plates and white paper cups so we could write everyone's name on it in sharpie so no one would get their cups mixed up. We got pink lemonade and water to drink and put the pink lemonade in a pretty glass pitcher that got the ribbon dress up as well.


For food, we made pizza logs (will be doing a post on that in the future), got a veggie tray, made cake batter blondies (you can find that recipe here) and firecrackers. Colleen made sugar cookies, and a friend made a cheesecake. We had sausages and hotdogs on the grill with individual bags of chips, and bags of sliced apples. 


For a party game, we had pin the tiara on the castle. This game came from the dollar store, but I bet you could make your own version.


Balloons on the mailbox (The universal sign for "Party over here!" and ribbons and crepe paper decorate the front porch


All in all, I think the party was a smashing success!

Monday, January 30, 2012

Pillowcase Dresses

These dresses are so easy to make and they will last through growth spurts because the ribbons allow for it. Eventually your daughter can even wear it as a shirt.

Pick out a cute fabric and a complementary ribbon. We found this cute flower pattern on the clearance rack.  I got one yard (to make sure I had enough in case of boo boos). Total cost for the dress: about $3.00. 

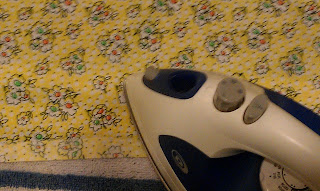
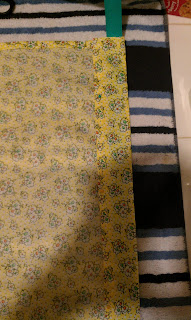
1. This dress is going to be 2T/3T so I took the fabric and unfolded it and folded it in half lengthwise. I ironed it that way so I could iron out where the fold was before and make a straight edge to cut on. I measured 23 inches and cut across. Then cut where the fold was to make the 2 sides of the dress. Next fold all four sides of the fabric at about 1/4 of an inch and iron it so it will stay until you sew it closed.


2. Once you have ironed all four sides, put the ribbon at the top and fold over so you make sure to have enough room for the ribbon to slide through easily. Iron the fold and remove the ribbon. Measure the fold and do the same for the other piece of fabric so that the folds will be the same.


3. Unfold the fold for the ribbon slot and sew all for sides of the fabric.


4. Refold the fold made for the ribbon and sew . I followed the seam line to make sure I had a straight line.


5.  To slip the ribbon through. Put a safety pin into one end of the ribbon, then feed it through the pocket.


6.  Pull the ribbon so it is even on both sides, then stitch in the middle so that the ribbon doesn't get pulled through in the washing machine.


7. Put the right sides of the fabric together and sew down the side 6" from the top. This will make the arm holes for the dress. (To see how far down you should sew for your dress, measure the arm hole length of one of  your daughter's shirts. Make sure it is a t-shirt that is loose, you don't want the arm gusset to be too tight. )


8. Turn the dress right side out and heat seal the ends of your ribbon (hold the end near a flame, this prevents the ribbon from ravelling) and your finished! Just tie the ribbons in pretty bows  to wear the dress.


Hospital Survival Kits

I have a few friends who recently found out they were pregnant, so I started cruising pinterest for some ideas for baby shower gifts. 

I found the perfect one! Some new moms and even veterans can forget things when packing for their hospital stay, this is the perfect remedy!

The Hospital Survival Kit originally came from the blog Jen's Own Road

The kit is basically things new mom's may not think about such as hair ties and headbands to tie your hair out of the way. Chapstick (make sure its natural) since you can't drink anything while in labor. Some chocolate because after delivery you deserve some chocolate! A snack for when babies come at inopportune times when the cafeteria is closed or if the hospital food is gross. And some makeup remover to wash your face with. I scrolled through the comments to see what other people suggested to put in their and some suggestions were travel size shampoo and conditioner, some soothing nursing pads and lanolin cream, maxi pads, Some magazines and/or a book, and some soft tissues.

I think this is a great idea for anyone having to stay in the hospital!

Thursday, January 26, 2012

Sugar Cookies

So, I'm really picky about my sugar cookies and have gone through dozens of recipes trying to find a good one.  Finally, after throwing out probably 5 lbs of dough over the years, I think I've done it.  (Thank you pinterest!)

Here is the recipe I used from i am baker :

http://iambaker.net/christmas-cookies-cookie-recipe

It made a lot of cookies and since I was testing it and didn't want to throw out a lot of dough if it was no good, I used the recipe divider here:

3/4 C butter
1 C Sugar
1 Egg
1 Whole Egg Yolk
2 tsp vanilla extract
1/2 tsp salt
1/2 tsp baking powder

1. Cream butter and sugar.
2. Add in eggs.
3. Add in vanilla.
4. In a separate bowl, sift together flour, salt, baking powder.
5. Slowly (about a cup at a time) add flour to butter mixture and combine.
6. Wrap dough in wax paper and refrigerate for a few hours.
7. Bake in oven at 350 degrees.


To keep the edges from running, I stick the pan with the shaped cookies on it in the refrigerator for 10-15 minutes.

Friday, January 20, 2012

Valentine's Wreath

Roses are red
Violets are blue
If you like free crafts
Then this one's for you!


This wreath is made using a wire coat hanger and walmart bags. I added some red sheer ribbon I had laying around and a piece of ribbon to hang it and voila. Keep reading for step by step instructions.


First you will need to bend your hanger into a heart shape. I recruited the man of the house for this task. While he was doing that I started cutting my bags. You will need approx. 18 of these. First Cut the bottom off the bag and the handles. Then cut along the seam so you end up with a rectangle.
Next you want to cut your strips. They should be about 2" wide and the length of the bag.
After you get all your bags cut (This will take awhile)  You want to use 2 strips at a time and cut them in half.  Then Wrap them 2 at at time (It will actually be 4 pieces at a time because they are cut in half)  Around the wire hanger using the same slip knot method from the tutu tutorial.

Fold in half then pull the tails thru the loop. Repeat until you cannot fit anymore on the hanger. You should end up with something that looks like this.
 
Fluff it up and put all the knots in the back and your done! Embellish however you like . I just took short pieces of sheer ribbon and tied it on using a double knot. Then tied some ribbon onto the back of it to hang it with. Simple and pretty decoration. Go ahead try it!

Thursday, January 19, 2012

Pigs in a Blanket

My mom use to make these for me growing up. They are super easy and delicious!

Ingredients
1 pkg of pillsbury (or your favorite brand) crescents
1 pkg of Lil' Smokies
shredded cheese (as desired) or you can get the lil' smokeys with cheese already baked in
ketchup (as desired)

Directions

1. Unroll the crescents onto wax paper.
2. Cut the big triangle into 3 smaller triangles using a pizza cutter or a butter knife
3. Place a sausage at the large end of the triangle.
4. If you are using cheese, this is where you will sprinkle the cheese over the sausage.
5. Roll the crescent up and place onto a greased cookie sheet.
6. Bake according to directions on crescent pkg.
7. Allow to cool, drizzle ketchup over each and serve.

Note from Lynt: I like to brush dijon mustard on the crescent before wrapping them up. My kids love them!

Making a Ring

I had a little scrap of tulle leftover from making the tutu. So I decided to use it. It was just about ring size, so thats what I decided to do with it.

1. tie the tulle loosely around your finger. Not too tightly or too loosely. The tulle will stretch so it should be able to fit on most fingers if you tie it around your index to start with. ( I started with my middle finger, but it ended up fitting my index finger and ring finger also. )


2. Pin down the two tails.


3. Sew where you pinned and cut off the excess.


4. Sew a button to the center.  I chose a pearl button.


5. Now you have a ring!


Monday, January 16, 2012

Taco Bake

This recipe originally came from my grandmother's mother. During the depression, it was hard to get food; one day she came up with this because the only thing in the pantry was some cornmeal, millk, an egg, some noodles, cheese, and ground beef. Ever since then, the recipe has been modified into what it is today.

Ingredients
1 box of chili cheese macaroni (Hamburger Helper)
1 pkg of corn bread mix
1 egg
2/3 C milk
1 1b of ground beef
1/2 C to 1 C of colby/montery jack shredded cheese
ketchup

Directions
1.Cook ground beef, drain oil. 
2. Prepare chili cheese macaroni according to directions on box.
3. Prepare cornbread mix according to directions. Pour cornbread mix into 8 X 8 baking pan.
4. Bake according to directions
5. Once chili cheese macaroni and cornbread has finished cooking, pour macaroni on top of cornbread.
6. Sprinkle shredded cheese on top of macaroni.
7. Place pan back in oven until cheese has melted.
8. Serve with ketchup drizzled on top.

Sunday, January 15, 2012

Healthy(er) Tuna Casserole

This is great to hide vegetables in (your kids won't even know they are there!)

Ingredients

1 box of your favorite macaroni
1 can of tuna
1 can of cream of mushroom soup
1 can of peas (or use frozen peas)
3 carrots
3 stalks of broccoli
1/2 Cup to a Cup of 2% milk shredded cheese

(you can use as much or as little vegetables as you like, you can also add or subtract your favorites)

1. Cook macaroni. 2. Add cream of mushroom soup. 3. Add tuna. 4. Add cream of mushroom soup. 5. stir to mix ingredients well. 5. puree vegetables together ( I use my blender b/c which works just as well as a food processor) 6. Add pureed vegetables to mix. 7. Mix until all ingredients are evenly distributed. 8. Pour mix into and 8 X 8 baking dish. 9. sprinkle cheese all over top. 10. Heat in oven on 375 degrees until cheese is melted.

I put potato chips on top of my tuna casserole. I like the salty crunchy with the soft stuff, but you don't have to, the casserole is good all by itself! And this recipe is so versatile, you can change the recipe however you like.

Friday, January 13, 2012

Easy Crustless Quiche


This is my go-to recipe for a delicious brunch or breakfast. You can substitute whatever meat and cheese or veggies you like. Enjoy!


  • 2 tablespoons butter, melted
  • 5 eggs, beaten
  • 1/4 cup finely chopped onion
  • 1 teaspoon salt
  • 1/2 cup all-purpose flour
  • 1 cup milk
  • 8 slices bacon cooked and crumbled-set aside
  • 4 ounces shredded Swiss cheese


  • 1. Preheat oven to 350 degrees F (175 degrees C). Lightly grease a 9 inch pie pan.                                   
    2. Line bottom of pie plate with cheese and crumbled bacon.
    3. Combine eggs, butter, onion, salt, flour and milk; whisk together until smooth; pour into pie pan.
    4. Bake in preheated oven for 35 minutes, until set. Serve hot or cold                                               

    Hangover Help

    Ok we've all been there before, had a few to many drinks and woke up feeling yucky. Not a big deal but when you have kids and things to do the next day this can really put a damper on your day. Here are a few helpful tips to keep you feeling great.

    First things first.  If you know you are going to be drinking, do yourself a favor and pick a some gaterade before hand and stick those in your fridge. You want to drink as much gaterade as you can before going to bed for the night. This usally minimizes the hangover at the very least. Now If your not able to do this or forget no biggie.


    When you wake up in the morning you are going to want something to coat your stomach. Any variety or flavor milk should do the trick. Drinkable yogurt works as well. I prefer chocolate milk. If you can't stomach it then you may want to go to the bathroom and get the vomitting over with, and take some pepto. If you can, go ahead and eat some crackers or toast. This will help with the nausea.

     Now for the headache. Take either Midol or Pamprin. Whatever you have in your medicine cabinent is fine as long as it isn't the p.m. variety. This stuff works wonders!  Now that you've done all that you can get your butt in the shower and go about your day. I hope you have found this helpful.   Cheers!

    Easy Homemade Pancakes

    These pancakes, are buttery, fluffy, and delicious, your kids will be happy to do their chores after a breakfast like this! (haha, wishful thinking)

    Ingredients
    1 Cup and 2 Tbl Flour
    2 1/2 tsp Baking Powder
    3/4 tsp Salt
    1 egg
    2 Tbl and 3/4 tsp Softened Butter
    2 1/4 tsp Sugar
    3/4 Cup and 3 Tbl Milk

    1. Soften Butter, add sugar and cream together.
    2. Measure flour, baking powder, and salt out, set aside.
    3. Add egg to butter and beat.
    4. Add milk and mix.
    5. Slowly add flour, baking powder, and salt until all is mixed together.
    6. Heat skillet or griddle until a bead of water will pop up
    7. Fry pancakes on skillet or griddle.

    Note from Lynt: Use old ketchup bottle as a pancake batter dispenser.

    Thursday, January 12, 2012

    Rockin' Turquoise Eyes


    Big Texas Hair


    Poetry

    Want a Cool gift for your Mom or boyfriend? Check out my book of poetry!


    Easy Chocolate Chip Cookies

    These are delicious and take about 15 minutes total to make, you will be the new queenbee of your neighborhood!

    These will make 10-12 cookies (depending on how big you make them) If you want more, you can double the recipe.

    Ingredients
    1 stick of butter (1/2 Cup)
    5 Tbl of Sugar
    5 Tbl of Brown Sugar
    1 C and 2 Tbl of flour
    1 Egg
    1/2 tsp Baking Soda
    1/2 tsp Salt
    1 tsp Vanilla
    Chocolate Chips of Choice

    1. Preheat oven to 375 degrees.
    2.Soften Butter in medium to large bowl
    3.Add Sugar and Brown sugar, cream together.
    4. Measure out flour in a small bowl, add baking soda and salt to flour, set aside.
    5. Add Egg and Vanilla to butter and sugar mix, Cream together.
    6. Add Flour mix to egg and butter mix. And stir until the ingredients are are mixed together.
    7. Add Chocolate Chips. (Once I ran out of chocolate chips and had a Ghiradelli baking bar and I cut this into chunks, you can go crazy with as much or as little chocolate as you want.)
    8. Bake cookies for 8-10 minutes or until edges are brown.

    I've noticed that depending on the weather (I'm not kidding) Sometimes, these cookies are fluffy if its dry and flat if its humid. So don't beat yourself up if they aren't fluffy. I've made these cookies 100 times and its a 50/50 shot each time.

    Wednesday, January 11, 2012

    Creating A Tutu

    These tutus are super easy to make and will only take an hour to two hours to complete (depending on how fancy you get with it).

    Materials

    1. 3 rolls of 6 in X 25 yd black (or your choice color) tulle
    2. 3/4 in Braided Elastic  (try to get the same color as the tulle or white)
    3. Scissors
    4. Thread the same color as the elastic


    keep the rolls after the tulle is gone (they can be repurposed later)

    1. Take the elastic and put it around the waist of the person the tutu is going to be made for, mark it and cut a little after the mark (just in case)

    2. Sew the elastic together 1/2 inch to an inch overlapping (This is because it will stretch out)

    3. Measure out how long you want the strip of tulle to be, keeping in mind that the length of the tutu will be half of what you measure (here I did 10 inches) Cut 5 strips this length. (The 5th strip is to measure out the next length)

    4. Take 4 of the strips and loop it around the elastic, creating a slip knot.


    5. Continue making the loops until they go all the way around.


    \

    6. Embellish however you like!